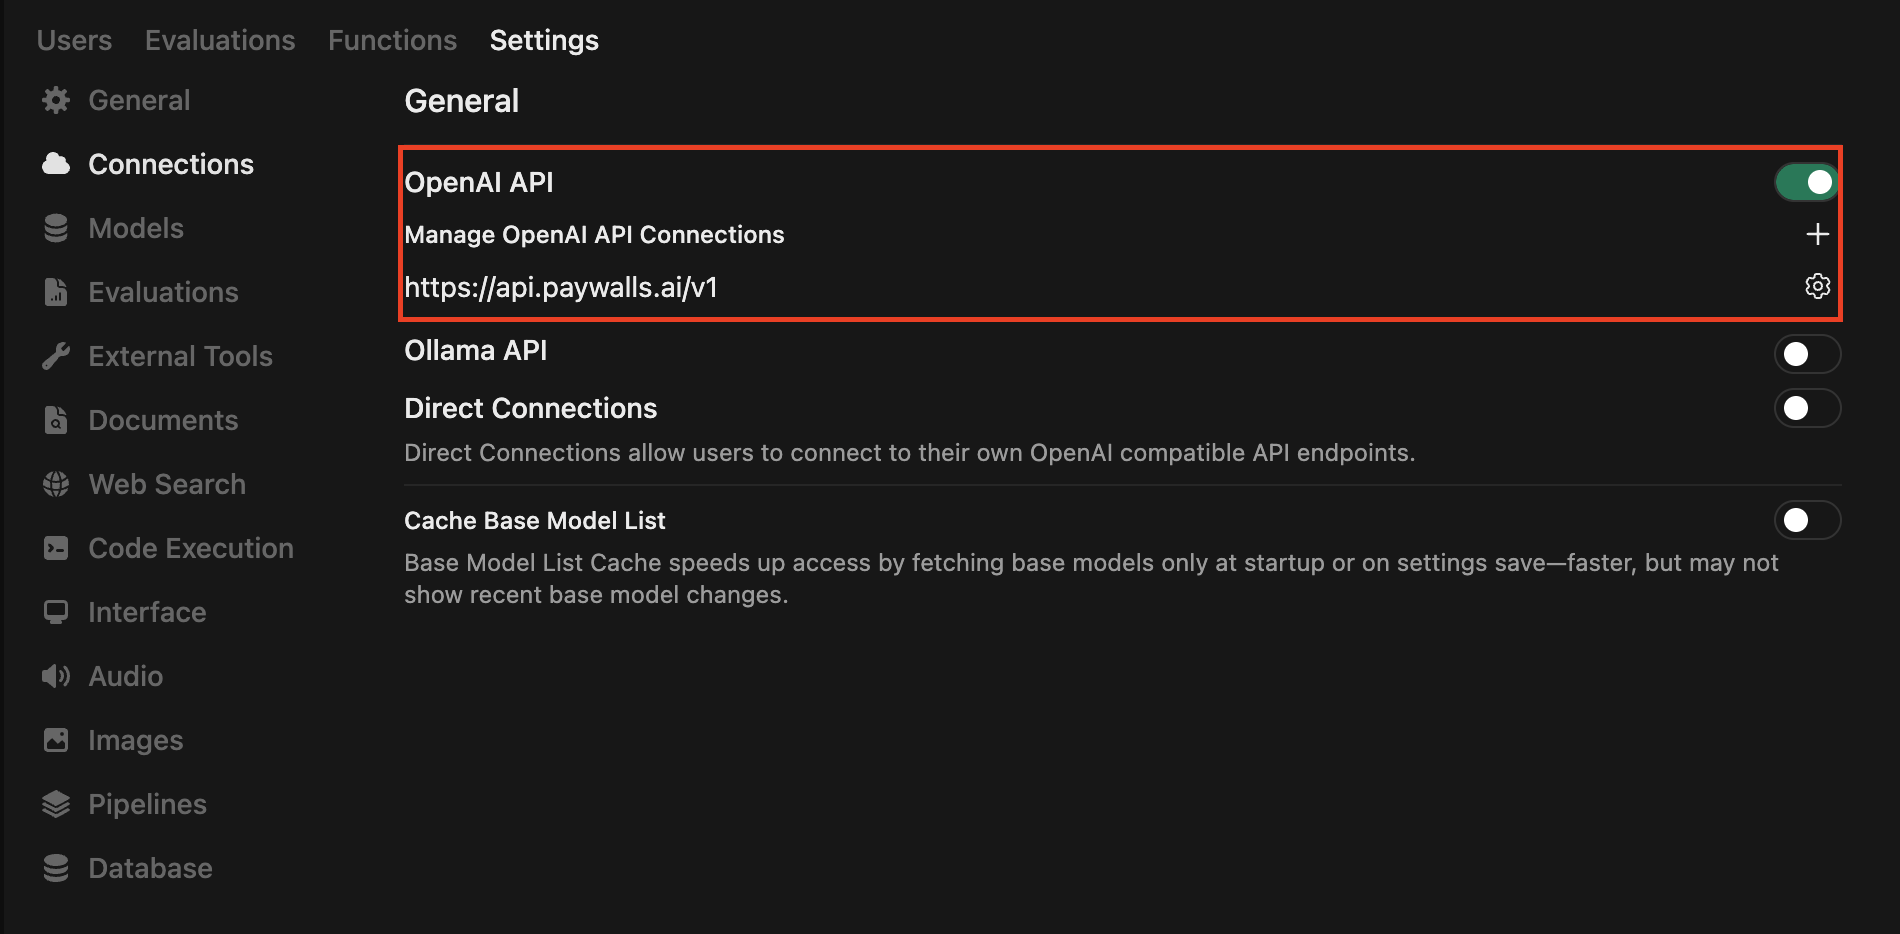
> ## Documentation Index
> Fetch the complete documentation index at: https://docs.paywalls.ai/llms.txt
> Use this file to discover all available pages before exploring further.

# Use Paywalls with Open WebUI

> Enable usage-based monetization for your Open WebUI deployment using Paywalls.

This guide shows how to turn any self-hosted [Open
WebUI](https://openwebui.com) instance into a usage-based, billable chat
experience powered by Paywalls.

<Columns cols={2}>
  You’ll point Open WebUI’s OpenAI-compatible
  connector to Paywalls, ensure every chat request carries the right user
  identity for metering, and end up with automatic per-user pricing, rate
  limits, and reporting—without changing your users’ workflow.

  <img
    src="https://mintcdn.com/paywallsai/uWK5fJvSSae2pRak/images/use-paywalls-with-openwebui/screenshot-1.png?fit=max&auto=format&n=uWK5fJvSSae2pRak&q=85&s=69f20feb55900922c421eb7ce29b25fa"
    alt="Open WebUI with
Paywalls"
    width="1162"
    height="412"
    data-path="images/use-paywalls-with-openwebui/screenshot-1.png"
  />
</Columns>

## Prerequisites

* Paywalls API key (Dashboard → Paywall → API keys)
* Open WebUI admin access (so you can edit Connections and Filters)

## 1. Add Paywalls as the OpenAI-compatible Connection

<Steps>
  <Step title="Open the Connections page">
    <Columns cols={2}>
      In Open WebUI click your avatar → <b>Admin Panel</b> → <b>Connections</b> → <b>+ New Connection</b>.

      <img src="https://mintcdn.com/paywallsai/uWK5fJvSSae2pRak/images/use-paywalls-with-openwebui/screenshot-2.png?fit=max&auto=format&n=uWK5fJvSSae2pRak&q=85&s=1d8409042ce8648bd08ea8422995b40e" alt="Open WebUI Connections" width="1900" height="934" data-path="images/use-paywalls-with-openwebui/screenshot-2.png" />
    </Columns>
  </Step>

  <Step title="Configure the endpoint">
    <Columns cols={2}>
      <div>
        Fill the form with the Paywalls details:

        <br />

        <br />

        <ul class="list-disc list-inside">
          <li class="mb-3">
            <b>Provider</b>: OpenAI Compatible - <b>Base URL</b>:
            `https://api.paywalls.ai/v1`
          </li>

          <li class="mb-3">
            * <b>API Key</b>: `sk-paywalls-...` (copied from the dashboard)
          </li>

          <li class="mb-3">
            * <b>Default model</b>: pick one of the Paywalls backed models, e.g.
              `openai/gpt-4o-mini` or leave empty to load all models dynamically.
          </li>
        </ul>

        Save the connection and (optionally) set it as the default for your workspace so
        every model inherits it automatically.
      </div>

      <img src="https://mintcdn.com/paywallsai/uWK5fJvSSae2pRak/images/use-paywalls-with-openwebui/screenshot-3.png?fit=max&auto=format&n=uWK5fJvSSae2pRak&q=85&s=62fa5cc135636d3088be351bcf7bbc88" alt="Open WebUI Configure Endpoint" width="1030" height="1098" data-path="images/use-paywalls-with-openwebui/screenshot-3.png" />
    </Columns>
  </Step>
</Steps>

## 2. Capture user identity for accurate billing

<div class="py-4">
  <Info>
    Paywalls meters usage per end user. Every request must include a stable user identifier via the body-level <code>user</code> field or the <code>X-Paywall-User</code> header (see <a href="/how-to-guides/pass-user-id">Pass user ID</a> for the full rationale).
  </Info>
</div>

<Columns cols={2}>
  Open WebUI filters can rewrite the JSON payload that is sent to every model. We'll add one that copies the signed-in user’s WebUI ID into the Paywalls-required `user` field so every completion and tool call is attributed (and billed) correctly.

  <img src="https://mintcdn.com/paywallsai/uWK5fJvSSae2pRak/images/use-paywalls-with-openwebui/screenshot-4.png?fit=max&auto=format&n=uWK5fJvSSae2pRak&q=85&s=d3fd7abe52a31866d4258dd91be73fff" alt="Open WebUI Filters" width="1900" height="584" data-path="images/use-paywalls-with-openwebui/screenshot-4.png" />
</Columns>

<Steps>
  <Step title="Add a new filter">
    Go to Admin Panel → <b>Functions</b> → <b>Filters</b> → <b>+ New Filter</b>,
    name it `Paywalls user injector`, choose `Python`, and paste the snippet
    below.

    ```python theme={null}
    import re
    from pydantic import BaseModel, Field

    class Filter:
      class Valves(BaseModel):
          prefix: str = Field(
              default="webui",
              description="Prepended to every user handle to keep it unique per deployment.",
          )

      def __init__(self):
          self.valves = self.Valves()

      def inlet(self, body: dict, __user__: dict) -> dict:
          # numeric WebUI user id with prefix and safe chars
          login = f"id_{__user__.get('id')}"
          safe = re.sub(r"[^A-Za-z0-9_-]", "_", login) or "unknown"
          body["user"] = f"{self.valves.prefix}_{safe}"
          return body
    ```

    <Info>
      Open WebUI passes the signed-in user's metadata via <code>**user**</code> when
      running filters (see [Filter Function
      docs](https://docs.openwebui.com/features/plugin/functions/filter/)).
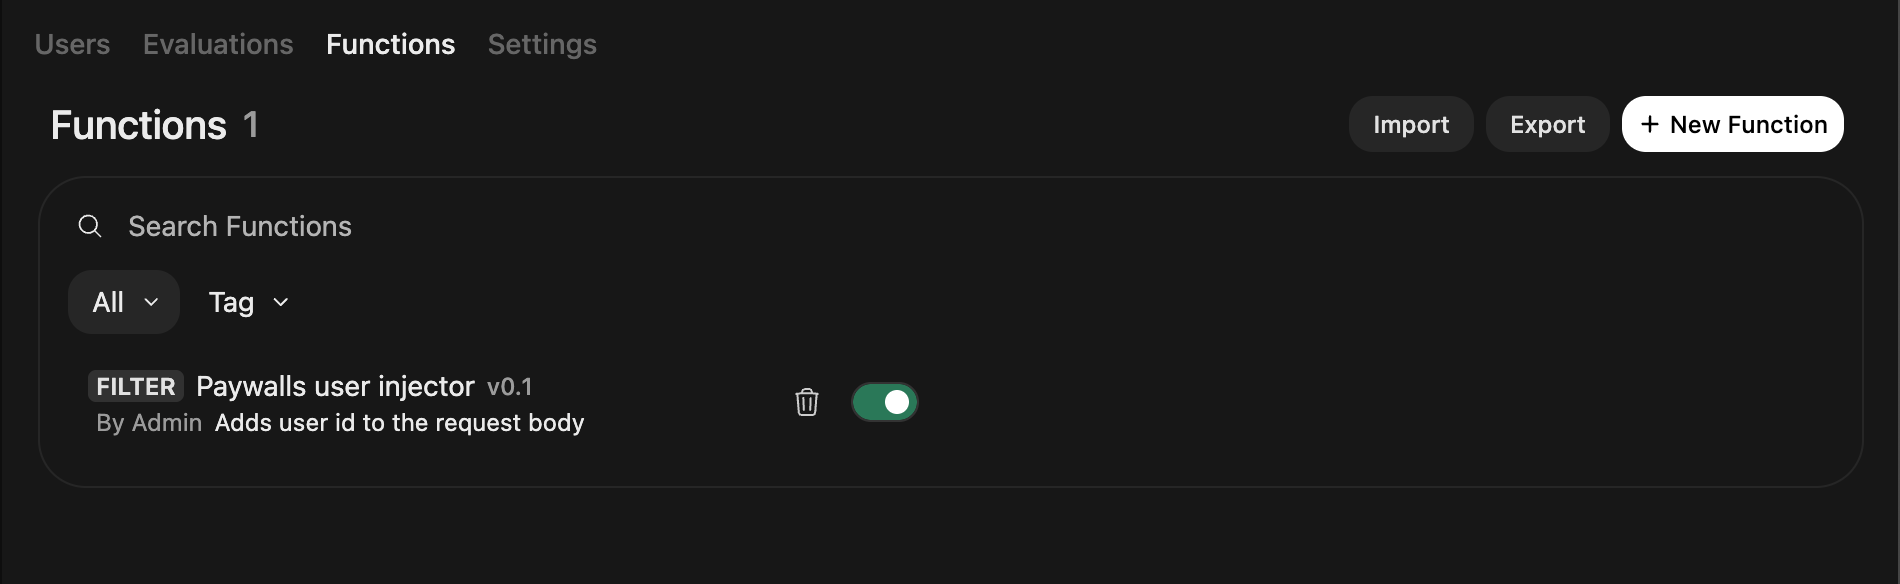
      Returning the modified <code>body</code> makes the change effective for the
      upstream API request.
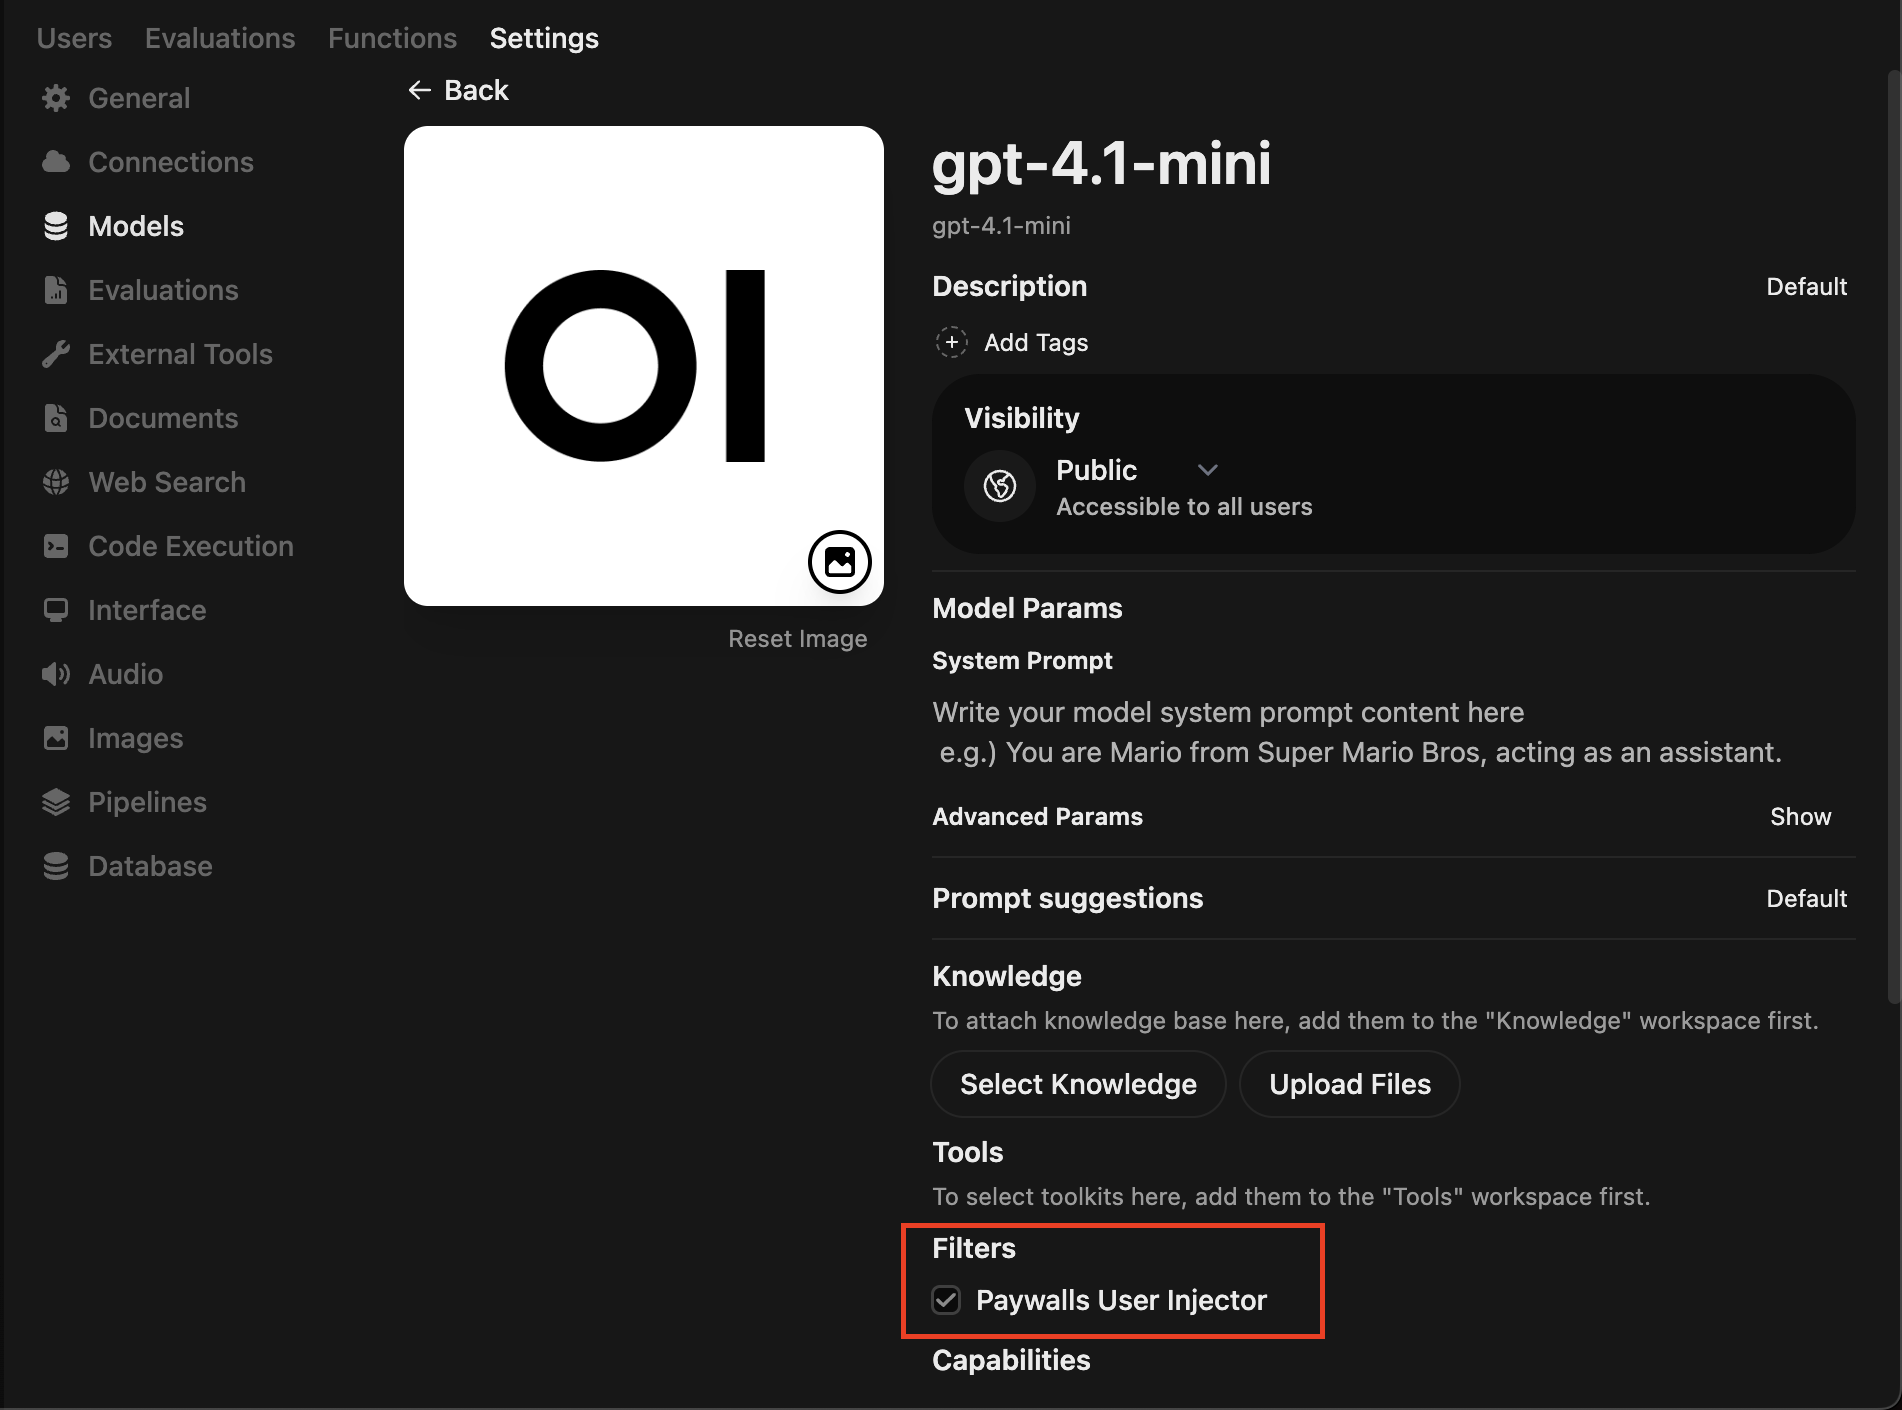
    </Info>
  </Step>

  <Step title="Attach the filter to your models">
    <Columns cols={2}>
      <ul>
        <li class="mb-3">
          1. Go to **Workspace → Models** and open each chat model that should charge
             through Paywalls.
        </li>

        <li class="mb-3">
          2. Scroll to **Tools / Filters / Actions**, enable **Filters**, and add
             **Paywalls user injector** to the active list.
        </li>

        <li class="mb-3">
          3. Save the modelfile. Repeat for every model that should hit Paywalls.
        </li>
      </ul>

      <img src="https://mintcdn.com/paywallsai/uWK5fJvSSae2pRak/images/use-paywalls-with-openwebui/screenshot-5.png?fit=max&auto=format&n=uWK5fJvSSae2pRak&q=85&s=7af66502e7ad596f8875355236072471" alt="Open WebUI Attach Filter" width="1902" height="1410" data-path="images/use-paywalls-with-openwebui/screenshot-5.png" />
    </Columns>
  </Step>
</Steps>

## 3. Test the integration

<Steps>
  <Step title="Start a new chat">
    Open WebUI main interface and start a new chat with a model that uses the
    Paywalls connection.
  </Step>

  <Step title="Send a prompt">
    Send a short prompt, e.g. <code>Hello!</code>. The model should respond
    normally, but if your Paywalls balance is zero you’ll get a topup message
    instead.
  </Step>

  <Step title="Top up and check billing log">
    <Columns cols={2}>
      Once you top up your Paywalls balance, send the message again. In the
      Paywalls dashboard → Paywall → Reports view you should see the billing log
      with the <code>user</code> you injected (e.g. <code>id\_1234567</code>).

      <img src="https://mintcdn.com/paywallsai/uWK5fJvSSae2pRak/images/use-paywalls-with-openwebui/screenshot-6.png?fit=max&auto=format&n=uWK5fJvSSae2pRak&q=85&s=c011279a6124434c8a417f2ac11da317" alt="Paywalls Billing Log" width="1186" height="512" data-path="images/use-paywalls-with-openwebui/screenshot-6.png" />
    </Columns>
  </Step>
</Steps>

## Related

<Columns cols={2}>
  <Card title="Pass user ID" icon="id-card" href="/how-to-guides/pass-user-id">
    Full overview of all supported Paywalls user identity mechanisms.
  </Card>

  <Card title="Workspace → Models" icon="sparkles" href="https://docs.openwebui.com/features/workspace/models/">
    Open WebUI’s reference for managing models, filters, and tools.
  </Card>
</Columns>
